
Seven Segment Display
The Seven Segment Display is a drag-and-drop virtualization for physical seven segment displays.
Description
When adding a seven segment display, you first need to decide which variable will control the segments of the display in the firmware. You can use individual bytes (unsigned chars) in firmware to control a seven segment display, or you can use an array of bytes in firmware and place multiple seven segment displays to drive multiple digits. We will use an array of three bytes to create a 3-digit display using three separate seven segment displays in this example. First, define the array of three bytes in firmware:
unsigned char SIM_SevenSegmentBuffer[3] = { 0, 0, 0 };
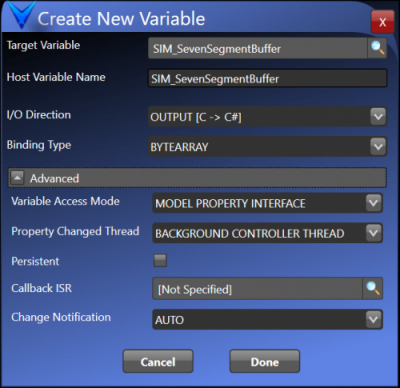
The firmware simply needs to write to these values in a virtual driver for a three-digit seven segment display. Add the SIM_SevenSegmentBuffer property to the Target Model using the Target Model Builder, as shown, to expose the buffer as a byte array. The Advanced settings shown are unchanged from the default settings. You could use manual change notification and manually notify the framework when you are done editing the buffer, but we will use automatic change notification and just let the framework handle that for us.
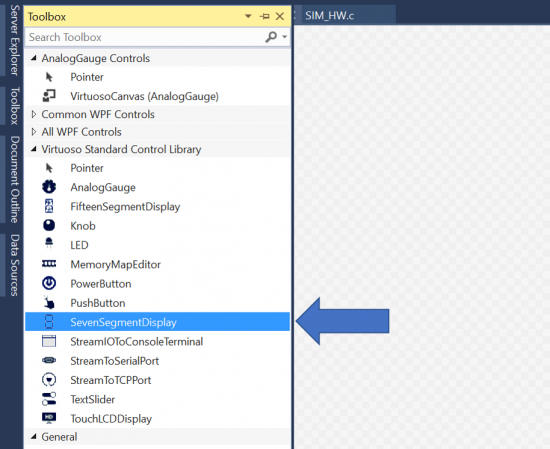
After adding the variable to the Target Model Builder and building the project, add three SevenSegmentDisplay controls to the host view by opening MainWindow.xaml in the Solution Explorer, and dragging and dropping the SevenSegmentDisplay controls from the Virtuoso Standard Control Library Toolbox.
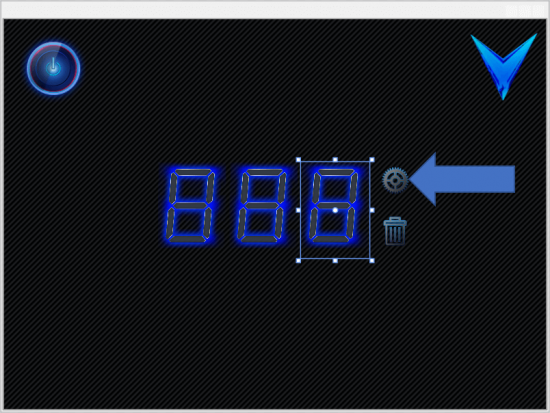
Open the SevenSegmentDisplay Design Wizard for each control by clicking the topmost icon next to each component instance.
The wizard dialog will open as shown below.
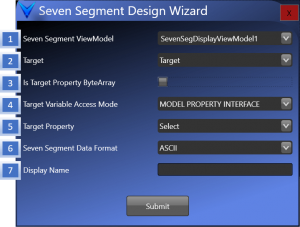
The configuration setting fields are described as follows:
1. Seven Segment View Model – Specifies the name to be used for the SevenSegmentDisplay view model property that is created for this seven segment display.
2. Target – Specifies which Target contains the SevenSegmentDisplay property to be bound to. A Virtuoso solution may host multiple embedded targets, and a separate view model is created for each target. These target view models are themselves a property of the ShellViewModel. This setting specifies which target view model property on the shell view model has the SevenSegmentDisplay output value to be displayed.
3. Is TargetPropertyByteArray – Specifies whether this seven segment display is binding to a specific byte inside a byte array, or binding to an individual byte. If this checkbox is checked, you will be prompted for the byte index inside the array which this seven segment display needs to bind to, as shown below.

4. Target Variable Access Mode – Specifies the variable access mode type you will be binding to for the SevenSegmentDisplay. The SevenSegmentDisplay can bind to “Target Model Property” bindings or “Model Property Interface” bindings. Only variables created in the Target Model Builder with the specified Variable Access Mode will be available to select as the target property. Model Property Interfaces are generally recommended
5. Target Property – Specifies the property or property interface to be bound to on the target specified by the Target selection above. The SevenSegmentDisplay target property variable must be first added to the Target Model class using the Target Model Builder, which manages and renders the Target Model class at design time. Add the SevenSegmentDislpay variable to the Target Model as a byte or byte array using the Target Model Builder if you haven’t yet. It should be configured as an “OUTPUT [C->C#]”. The variable can be added as either a conventional target model property, or a “property interface”, which is itself an object. The use of a property interface is recommended. Start typing your SevenSegmentDisplay target variable name after the target has been compiled, and text completion options will be presented to help find and select your variable. If your variable is not found, you might need to close the design wizard, rebuild your target project, and then reenter the design wizard settings.
6. Seven Segment Data Format – This specifies the format of the data that the variable contains. ‘ASCII’ means the variable contains an ASCII character, and the character will be displayed by the Seven Segment Display the best way possible. ‘RAW’ uses a raw bitmap to individually turn segments on. The bitmap below shows the mapping of bits to segments.

7. Display Name – Can be used to add a label below the Seven Segment Display.
Click “Submit” to submit the SevenSegmentDisplay configuration once all items have been specified. The SevenSegmentDisplay may be resized as needed by clicking on the SevenSegmentDisplay in the XAML design time viewer and using the resize handles. When deleting a SevenSegmentDisplay from a view after it has been configured by the wizard, you should use the “Delete” icon below the “Wizard” icon. If an SevenSegmentDisplay hasn’t been configured yet, you will need to just click on the SevenSegmentDisplay and press the delete button to remove it from the view.
When a SevenSegmentDisplay is dragged from the Virtuoso Standard Control Library to a window, this results in the XAML declaration as shown below to be added to the view.
![]()
The SevenSegmentDisplay component wizard automates the configuration of the SevenSegmentDisplay view component as a normal MVVM view component, just like a TextBox or a Button. Using the wizard to configure the SevenSegmentDisplay as outlined above performs the following standard MVVM design tasks in the background:
1) A SevenSegmentDisplayViewModel component is added as a property of the specified Target ViewModel class, as shown below:
private SevenSegDisplayViewModel _SevenSegDisplayViewModel1;

public SevenSegDisplayViewModel SevenSegDisplayViewModel1

{

    get

    {

        return this._SevenSegDisplayViewModel1;

    }

}
2) The SevenSegmentDisplayViewModel component is constructed in the TargetViewModel initialization function based on the desired configuration. This is added as construction code in the Target ViewModel’s InitializeComponents method, as shown below.
_SevenSegDisplayViewModel1 = new SevenSegDisplayViewModel(this, SIM_SevenSegmentBuffer, 0, SeveneSegmentDataFormat.Raw, "");
3) The DataContext property for or the SevenSegmentDisplay view is bound to the new SevenSegmentDisplayViewModel property exposed by the Target ViewModel, as shown below.
